Powered by Blogger.

WINDOWS 5 Ways to Access a Locked Windows Account

Coming to the aid of a fellow forum member, TSers recently shared around a dozen ways to handle a lost Windows password. We were so impressed with the list that we've decided to editorialize some of it for easier access.
We've included five of what seem like the most approachable ways for resetting or recovering your Windows password along with abridged instructions on how to execute them and some alternatives toward the end.
Before moving on, if you log into Windows with an online Microsoft account (offered as the default during setup since Windows 8), you can likely just reset it online at Microsoft's site using another device with Internet.

#1 Use a command prompt to change your password from the Windows login screen

How it works: Swaps the Utility Manager on your Windows login screen for a command prompt, from which you can change the forgotten password.
What it works on: Your offline Windows account. Doesn't require extra software though an installation disc might be handy for the first step. Windows XP users can skip past step 3.
To put a command prompt on your login screen you'll need to use a separate command prompt from your Windows installation disc, a recovery drive/partition or by accessing the 'Advanced Startup Options' some other way. After testing, nothing has been as reliable or easy as simply booting off a Windows disc/USB drive, which you can set up without having a license:
Download Windows 10 - Setup instructions - Quick navigation: After booting off the installation media and reaching the first prompt for your language, region etc. you can simply hit Shift + F10to make a command prompt appear.

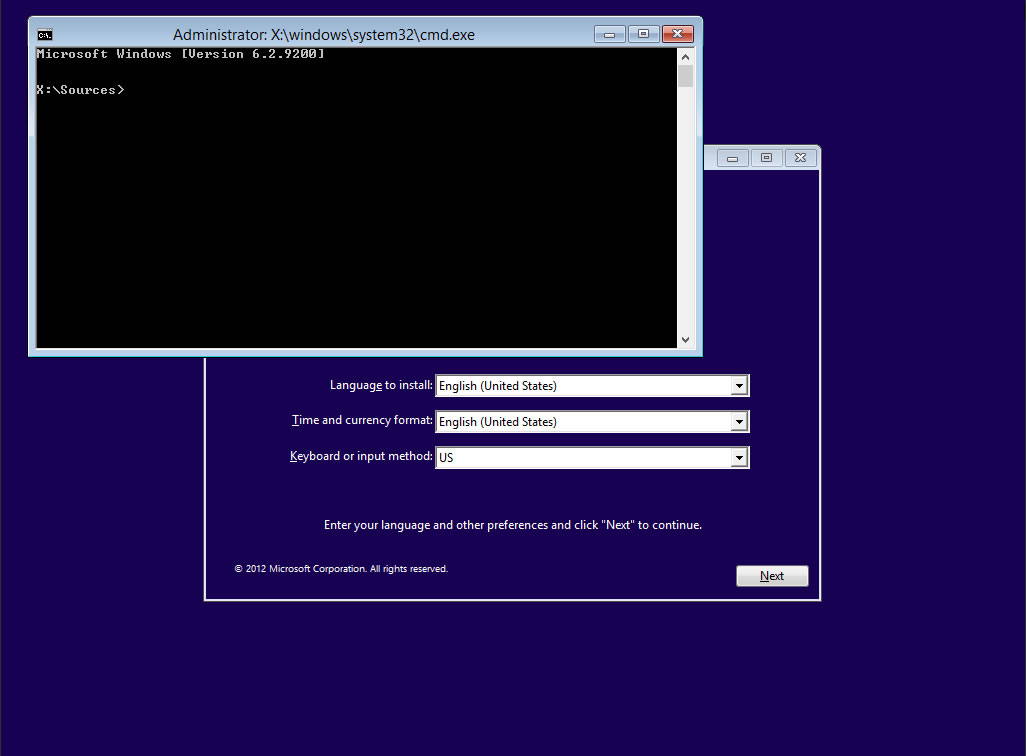
Step 1: Swapping the Utility Manager for a command prompt

Assuming you've made it to a command prompt, enter the two lines below to create a backup of the Utility Manager and then overwrite it with cmd.exe.
Note that "?" should be your Windows drive letter. To list all your drives launch DiskPart by typing diskpart and then enter list volume.
move ?:\windows\system32\utilman.exe ?:\windows\system32\utilman.exe.bak
copy ?:\windows\system32\cmd.exe ?:\windows\system32\utilman.exe
Reboot. Now when you click the Utility Manager on your login screen, it should launch cmd.exe.

Step 2: Changing your password

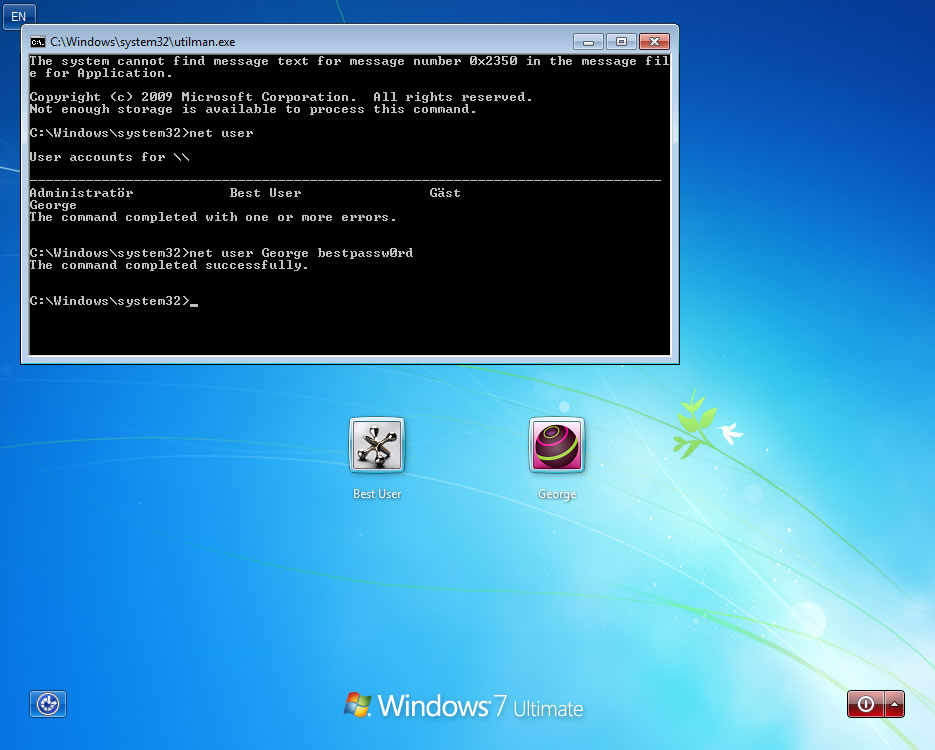
At the command prompt on your login screen, enter the following line to set a new password on your account (USERNAME is your account name and PASSWORD is the password you'd like to apply):
net user USERNAME PASSWORD
Example: net user George bestpassw0rd -- also, typing net user alone will list the accounts if you can't remember your username either.
Bonus: From the command prompt on your login screen, enter control userpasswords2 for a GUI-based account manager.

Step 3: #&@!... That didn't work!

You still have options. In the command prompt, enter the text below to enable the default administrator account (requires a reboot):
net user administrator /active:yes -- /active:no when you're done with the account later
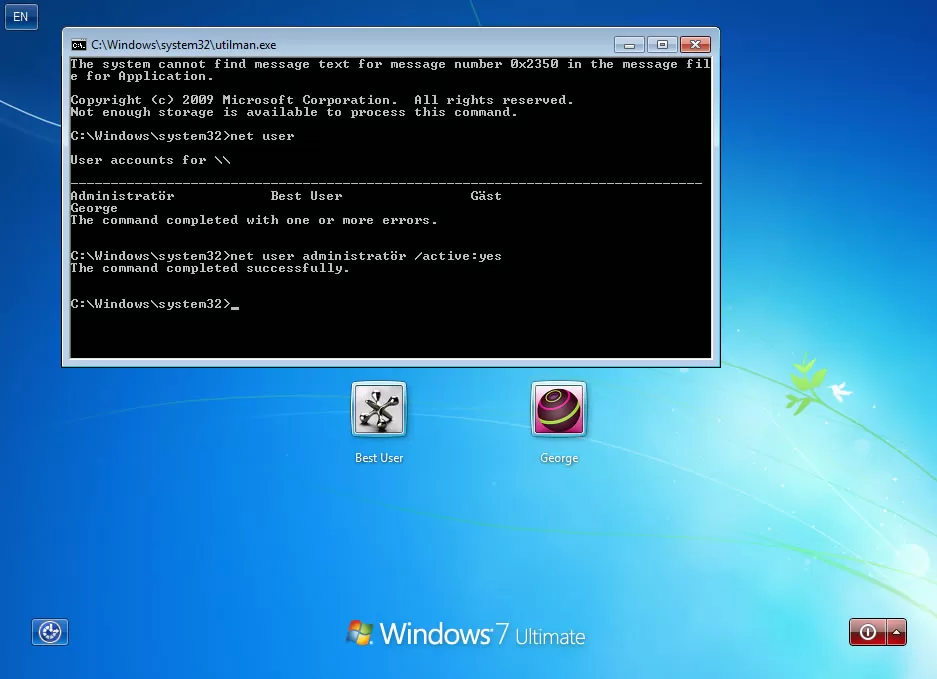
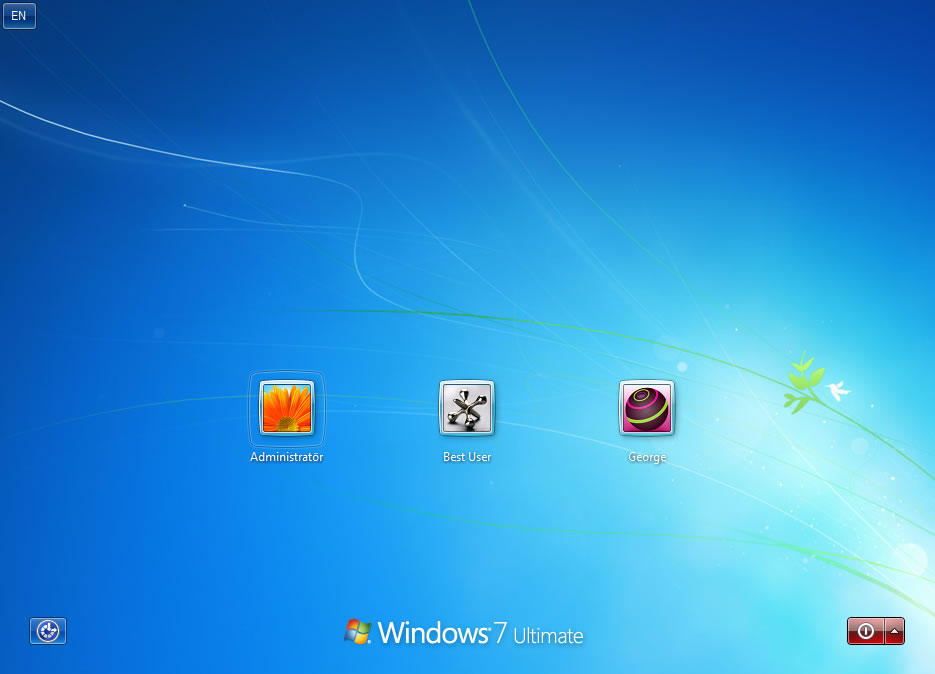
After rebooting you should see the Administrator account listed and it shouldn't need a password to log in. Retry step 2 from a command prompt within this elevated account.
These steps are less involved on Windows XP:
  • Boot into Safe Mode with Command Prompt (reboot your PC and tap F8 as it's starting up but before Windows loads to see the option)
  • Tap control + alt + delete twice at the login screen for the option to type in a username and enter Administrator which should provide access to a command prompt where you can view Windows accounts by typing net user and apply a new password via net user USERNAME PASSWORD(example: net user Bill bestpassw0rd)
  • Reboot and try the new password

#2 Official Microsoft DaRT disk

How it works: Offers TechNet subscribers a "Locksmith" tool using the familiar Windows GUI to set a new password on the account(s) of your choosing.
What it works on: The DaRT version number typically matches the copy of Windows it works on (DaRT 10 is for Windows 10 etc.).
Based on the Windows Preinstallation Environment, DaRT (Diagnostics and Recovery Toolset) is an official Microsoft utility suite that includes a registry editor, file explorer, crash analyzer as well as tools to restore files, repair disks, scan for viruses and more. Among them is a straightforward utility that should have a new password applied to your Windows account after a few clicks and may be less spooky than software such as Ophcrack.
Professionals with access to volume licensing for Microsoft products can also download the Microsoft Desktop Optimization Pack, which is another boot disk that contains a copy of DaRT.
Download Microsoft DaRT - Setup instructions - Quick navigation: Open "Locksmith" and follow the prompts.

#3 Offline NT Password & Registry Editor (Chntpw)

How it works: Gives you a bootable environment outside of Windows to edit the password in your SAM file.
What it works on: The local account of any NT-based Windows operating system, which includes Windows 2000 through Windows 10 (excluding fully encrypted NTFS partitions).
This might be the most used password recovery tool considering it's included with popular boot disks and Linux distros such as Hiren's Boot CD, Kali Linux and Trinity Rescue, which calls its password tool "winpass" but it's actually just a script that launches NTpasswd/Chntpw.
Assuming you have one of those solutions around, that might be the quickest path to accessing Windows again. If you're familiar with one of them but don't have it handy, here are the download links and quick setup instructions for each one mentioned:
  • Download Hiren's Boot CD - Setup instruction - Quick navigation: Launch Offline NT/2000/XP/Vista/7 Password Changer from the main menu > choose your Windows installation > Edit user data and passwords
  • Download Kali Linux - Setup instructions - Quick navigation: Mount your Windows drive > go to MS SAM (cd /media/win/Windows/System32/config/) > enter chntpw -u [username] SAM > choose clear or edit password
  • Download Trinity Rescue - Setup instructions - Quick navigation: Press enter to run Trinity > Windows password resetting > Interactive winpass > choose your Windows installation > Edit user data and passwords
If you'd rather go straight to the source, you can also download and boot from only the password recovery tool itself:
Download Offline NT Password & Registry Editor (Chntpw) - Setup instructions - Quick navigation: Press enter to boot when prompted > choose your Windows installation > 'Password reset (SAM)' > Edit user data and passwords > Enter the desired user's RID > Clear (blank) user password

#4 Ophcrack LiveCD

How it works: Provides a bootable environment that uses LM hashes through rainbow tables to brute force your Windows password, which is provided once discovered.
What it works on: Windows (both local and Microsoft accounts), Linux and Mac OS X
Perhaps the second most notable password recovery tool and maybe the most memorable by name, Ophcrack will also require you to download an ISO and put it on a bootable disk or drive, though it uses different technology than Offline NT/Chntpw so it could make for a fantastic backup solution and may even be worth trying first.
Although it's commonly flagged by antiviruses as being a potential threat, Ophcrack isn't loaded with malware. The subject is addressed on the software's FAQ section, which notes that the installer includes a tool called "pwdump6" by Fizzgig that often turns up as a false positive, typically because of the files "samdump.dll" and "pwservice.exe" -- again though, neither pose a known security risk.
Download Ophcrack LiveCD - Setup instructions - Usage guide/tips - Quick navigation: Enter Ophcrack Graphic mode - automatic > Double click Launcher on the LiveCD desktop > Search for tables and start Ophcrack
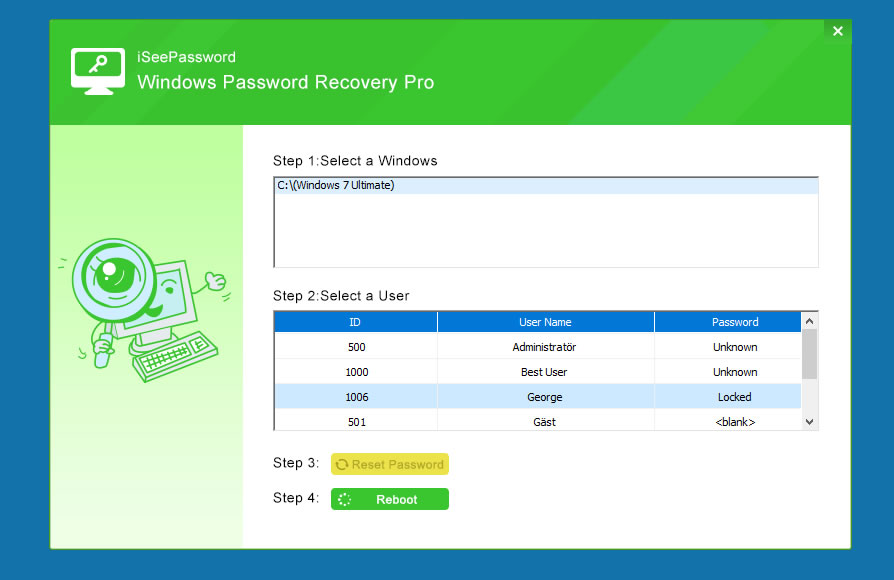
#5 iSeePassword

How it works: Provides a boot disk with a clean GUI that shows detected Windows users and their passwords along with the ability to reset them.
What it works on: Windows XP through 10 including Server editions etc. with separate tools for passwords on MS Office, iTunes, PDFs and RARs.
In the event that you'd like to pay for your mistake, iSeePassword charges ~$30 for a "Password Recovery Bundle" that covers more than just Windows and although you'll still have to make a bootable disc/drive to load the software, it will display everything you need in the first window that appears so there isn't any navigation once you're in -- perhaps the only perk of going paid.
Buy iSeePassword - Setup instructions - Quick navigation: None! Is that quick enough?

Additional tips and honorable mentions

While easier said than done if your password is already lost, the best way to avoid this situation is not losing it in the first place, either by writing it somewhere safe or keeping a digital backup on your phone, on the cloud, or in dedicated software such as Keepass.
Microsoft's method for resetting an offline Windows password is about as useful as not losing it at all because you have to create the password reset disk in Windows before locking yourself out and that tool only works on the account/PC used to create it.
If the forgotten password was recently applied and you don't mind using Windows Restore, you can wind back to a point before changing it: Tap F8 during bootup before Windows loads to reach advanced boot options > repair your computer > system restore.
Few if any of these methods will help with a lost pin code or picture password, and although the open source utility 'Mimikatz' can extract plaintext passwords, PIN codes and kerberos tickets from memory, it doesn't seem as straightforward to use as the tools above.
Hopefully if you're still reading this you've figured out how to get back into your Windows account, but in the event that none of those methods worked for you, here are four more tools worth trying that work differently than those we've already mentioned.
Published: By: Unknown - December 05, 2017

How to Reboot and Reset Android Devices


Sometimes things go wrong and knowing how to hard reboot or reset your Android device can come handy.
To kick things off I think it is best to explain the difference rebooting and resetting. Rebooting is the same as restarting, and close enough to powering off and then turning off your device. The purpose is to close and reopen the operating system.
Resetting, on the other hand, means taking the device back to the state in which it left the factory. Resetting wipes all your personal data. Although the terms may seem similar they are quite different.

Soft and Hard Reboot

Rebooting or restarting is the way to go if your phone or tablet starts acting funny, or maybe showing a bit of sluggishness. If you experience one of those symptoms all you need to reboot is press the power button and choose restart. This is also known as a "soft" restart.
But what if you device freezes, goes blank, or becomes unresponsive and you can't get to that menu… What do you do then?
You can go for what is known as a "hard" reboot. Depending on your device, this can be achieved by pressing a combination of buttons. In most Android devices, you have to simultaneously press the power and volume down buttons for 5 seconds. This should work for any stock Android device like Google Nexus and Google Pixel, Samsung Galaxy, and LG phones.
Some other devices, like most Motorola phones are slightly different, the procedure is the same but instead of using the volume down button you use the volume up button.

The Factory Reset

If you need to reset your Android device to its factory state (a common reason is if you're selling and moving to a new phone), there are two ways to perform a reset.
Android offers a built-in soft reset option, readily available from your phone's settings menu. Go to Settings, choose Backup & Reset and the select "Factory Data Reset." You will be prompted to confirm. Once you take the plunge, your phone will be wiped from any personal data and clean boot exactly how it was when it came out of the box. Do note memory cards inserted will be left untouched.
Finally, there is the hard reset. This is somewhat of a last resort. The most common scenario for using this option is a bricked device, something went awfully wrong, and there's no way of getting Android to boot.
To perform a hard reset:
  • Turn off your device.
  • Hold the power button and the volume down button simultaneously until you get the Android bootloader menu.
  • In the bootloader menu you use the volume buttons to toggle through the different options and the power button to enter/select.
  • Choose the option "Recovery Mode."
  • You should see the words “no command” in a black screen.
  • Press and hold the power button. While holding the power button press and release the volume up button.
  • You should now see a list menu with the option to Wipe data/Factory reset.
After selecting the Factory reset option you will warned you are about to erase all user data. If your mind is made up, select Yes and your device will be restored to its factory state.
Published: By: Unknown - December 05, 2017

18 keyboard shortcuts that can help you on Windows 10


Microsoft introduces you with 18 keyboard shortcuts that make it easier to use Windows 10's latest OS.
Windows 10 Shortcuts
1) Windows key + A  Action Center opens.
2) Windows key + C  Personal Assistant opens the listening mode kearttanaye.
3) Windows key + I  Opens the Settings window.
4) Windows key + L  to lock the PC / user account allows you to change quickly.
5) Windows key + D  Display and hide the desktop.
6) Windows key + E  File Explorer opens.
7) Windows key + S  to open the Search window.
8) Windows key + Number  will open the application that is based on the task bar at the back of their order.
9) Windows key + Arrow key  Snap app windows left, right, corners, maximize, or minimize.
10) Windows key + Ctrl + D  to add virtual desktop.
11) Windows key + Ctrl + Left or Right arrow  Switch between virtual desktops.
12) Windows key + Enter  Open Narrator.
13) Windows key + Home  Minimize all but the active desktop window (restores all windows on second stroke)
14) Windows key + Tab  to open the Tasks view.
15) Ctrl + Shift + Esc  to open Task Manager.
16) Alt + Tab  Switch between open apps
17) Windows key + PrtScn  to take a screenshot.
18) Windows key + Shift + Up arrow  Stretch the desktop window to the top and bottom of the screen.
Published: By: Unknown - December 05, 2017

WhatsApp tricks - You definitely need to know


In Kerala, those who do not listen to what's currently going on will be very few. Most of those who own a smartphone are using WhatsApp. Below are some of the most useful tips for WhatsApp users.
WhatsApp Tips and Tricks
1) vattsapp to avoid the photos / videos How to pheatteareal or Gallery app , we can not predict the nature of the photos and videos that are coming through vattsapp. These will be viewed in the standard phone's gallery app. To get rid of the iPhone, go to the Settings menu of the phone by clicking on the Privacy option, and then take the Photos tab and then Select the WhatsApp option. It's a bit of work to prevent photos from being on Android phones. Find a Watts image folder and video folder using a file explorer like ES File Explorer. Then make and save each file named '.nomedia' in both. Doing so, the Gallery app will stop scanning these folders.
2) may be subject to control access to the profile of the film
have vattsappil such a way that anyone can download the file to your profile. To change this, you can put the Profile Picture Sharing into 'Privacy Contacts' in the Privacy menu.
3) "The Last Scene" and want to avoid the option
to take the vattsapp Settings menu and then Account -> Privacy -> Last Seen can go di'akrriverr.
4) If you lose your phone di'akrriverr and vattsapp account
with your phone if you lose, you vattsapp used the account to the account di'akrriverr vattsapp lost phone number to another phone, use the vattsapp. If you have a SIM card used on the lost phone, you will need to duplicate the SIM.
5) Do not forget to log out when you use the web vattsapp
released recently directed to log in to the desktop vattsapp. So security is important too. Do not forget to log out a desktop version once logged in.
Published: By: Unknown - December 05, 2017

How to send files up to 10 GB via Gmail?


There are no people who do not want to send at least 1 GB of file via email. I submit this post for those who wish. With a help of Google Drive, Gmail will help you to send files up to 10 GB using the shortcut. This is only possible through the desktop web browser.
1) First of all,  mail.google.com  visit.
Gmail send big file
2) Login to your Gmail account.
Gmail send big file
3) Click on the Compose button on the left side of your inbox to send a new email.
Gmail send big file
4) കമ്പോസ് വിന്‍ഡോയുടെ താഴെ ഇടത് വശത്ത് കാണുന്ന “+” ഐക്കണിന്റെ മുകളില്‍ മൗസ് പോയന്റ്ര്‍ കൊണ്ട് വരുക.
Gmail send big file
5) ത്രികോണാകൃതിയിലുള്ള ഗൂഗിള്‍ ഡ്രൈവ് ബട്ടണില്‍ ക്ലിക്ക് ചെയ്യുക.
Gmail send big file
6) അപ്പോള്‍ തുറന്നുവരുന്ന വിന്‍ഡോയിലേക്ക് അറ്റാച്ച് ചെയ്ത് അയക്കേണ്ട ഫയല്‍ വലിച്ചിടുക അല്ലെങ്കില്‍ select files from your computer എന്ന ബട്ടണ്‍ ക്ലിക്ക് ചെയ്യുക.
Gmail send big file
7) select files from your computer എന്ന ബട്ടണില്‍ ആണ് നിങ്ങള്‍ ക്ലിക്ക് ചെയ്തത് എങ്കില്‍ അപ്പോള്‍ തുറന്നുവരുന്ന വിന്‍ഡോ വഴി നിങ്ങളുടെ ഹാര്‍ഡ്ഡ്രൈവില്‍ നിന്നും അറ്റാച്ച് ചെയ്യേണ്ട ഫയല്‍ തെരഞ്ഞെടുത്ത് ഓപ്പണ്‍ ബട്ടണ്‍ ക്ലിക്ക് ചെയ്യുക.
Gmail send big file
8) തുടര്‍ന്ന് അപ്‌ലോഡ്‌ ബട്ടണ്‍ ക്ലിക്ക് ചെയ്യുക. അങ്ങനെ നിങ്ങള്‍ക്ക് അയക്കേണ്ട ഫയല്‍ സുരക്ഷിതമായി ഗൂഗിള്‍ ഡ്രൈവിലേക്ക് സേവ് ആകും. സൈസ് കൂടിയ ഫയല്‍ ആണേല്‍ അപ്‌ലോഡ്‌ ആകാന്‍ നിങ്ങളുടെ ഇന്റര്‍നെറ്റ് സ്പീഡ് അനുസരിച്ചുള്ള സമയം എടുക്കും.
Gmail send big file
9) Fill the subject, subject and email body. After all, click the Send button.
Gmail send big file
10) Next, change the settings of the file you uploaded. You can control who can see the file you uploaded.
Gmail send big file
11) Then click on the Share & send button.
Gmail send big file
12) So you've sent a large size file via Gmail. Whom do you send to see a link to the file you uploaded to your email.
Published: By: Unknown - December 05, 2017

You do not need to type Malayalam in the phone anymore, just say Google will type it for you

inter © 2017 phone is no longer Do not you have to type in Malayalam. In Google, you can type in Malayalam for your phone. It's hot. This system will now be available only on Android phones. This service can only be used if there is no Internet connectivity in the phone. Offline version is not available right now.

Type Google Voice Malayalam Typing
To get this service on your phone first  update the golf  or Google Keyboard app. Then go to Languages ​​& input section of Phone Settings and enable Google's Voice Typing to set its primary language into English. Make sure that internet connectivity is on your phone and then tap to where you want to type. Select Google Voice Typing. Then press the mike icon on the screen and tell you to type in malayalam.
You'd be typing what you told in Malayalam where you intended to type. The speed of your phone comes with the speed of the internet speed on your phone. It only works if the phone has Internet connectivity. Just send it to Google's server, and from there you will find the same Hindi words on the screen as you say. This service is also available in Google's Voice Search app.
Watch this Youtube video to set Google voice typing in your phone.
Google has added 8 Indian languages, including Malayalam. The other seven languages ​​are Tamil, Telugu, Kannada, Marathi, Gujarati, Bengali and Urdu. Hindi has long been in the service of changing Google's voice words.
The vast majority of new Internet consumers in India will be speakers of local languages. In the forefront of this, Google embodies all of its services in Indian languages. Anyone who wants to use Android phone can no longer chat in Malayalam to search, send and email. Thank you very much to Google
The service is made by technologies such as Machine Learning and Natural Language Processing. In order to increase the accuracy of this, Google has trained local language speakers to collect the sound samples of the words they speak fluently and collect machine learning models. Machine Learning Technology has been used on this since the use of this service increases the accuracy of the service.
The content available in the local language will be available on the Internet more quickly and conveniently as it facilitates the ability to type Indian languages, including Malayalam. This article was written by Google's voice typing.
Published: By: Unknown - December 05, 2017